Azure Table Storage

About Azure Table Storage
Windows Azure Table storage is a service that stores structured data in the cloud. It's like NoSQL but with more of the SQL, for example it does not store the data as a Document but as rows. You still get the flexibility of NoSQL storage.
Table storage is a non-relational, key-value-pair, storage system suitable for storing massive amounts of unstructured data. Whereas relational stores such as SQL Server, with highly normalized designs, are optimized for storing data so that queries are easy to produce, the non-relational stores like Table Storage are optimized for simple retrieval and fast inserts. Table storage is schemaless, it's easy to adapt your data as the needs of your application evolve. Access to data is fast for all kinds of applications. Table storage is typically significantly lower in cost than traditional SQL for similar volumes of data.
You can use Table storage to store flexible datasets, such as user data for web applications, address books, device information, and any other type of metadata that your service requires. You can store any number of entities in a table, and a storage account may contain any number of tables, up to the capacity limit of the storage account.
Pricing
Windows Azure table storage is cheap. All you pay for the number of transactions and the amount of storage you need. So no licences, no servers, no VM's just what you need when you need it.
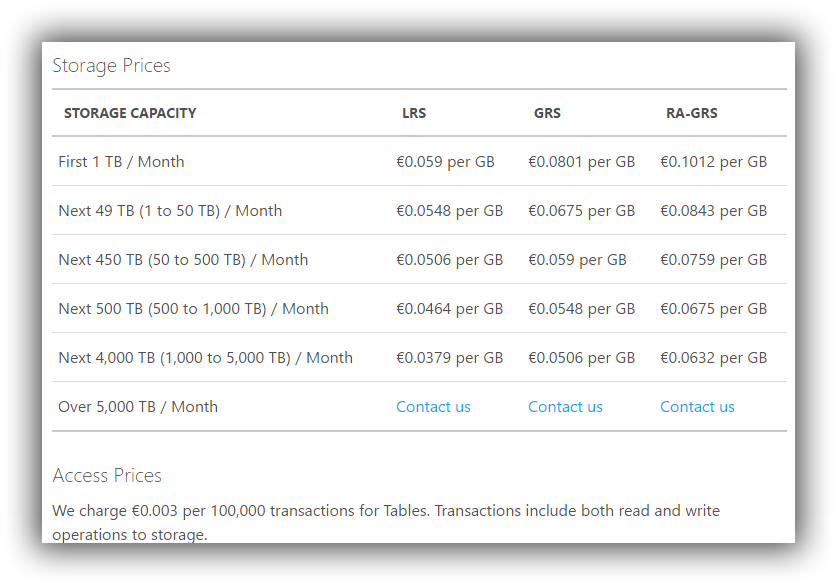
This is the pricing in EUR for North Europe for more go here and select "Table" as the storage to see the pricing.
So what that means is that if I want to store 100 GB of data and access it 200,000 times. I pay less than EUR 6. That's great however you look at it. It means I can store a massive about of data and have quick ready access to it and not have to worry about the cost.
Getting started
To get started, open your Azure Protal and select "New" filter to "Storage account" and select "General Purpose" provide a name and select the "Resource Group"

Once you hit create you have to wait for it to deploy and create the storage account.
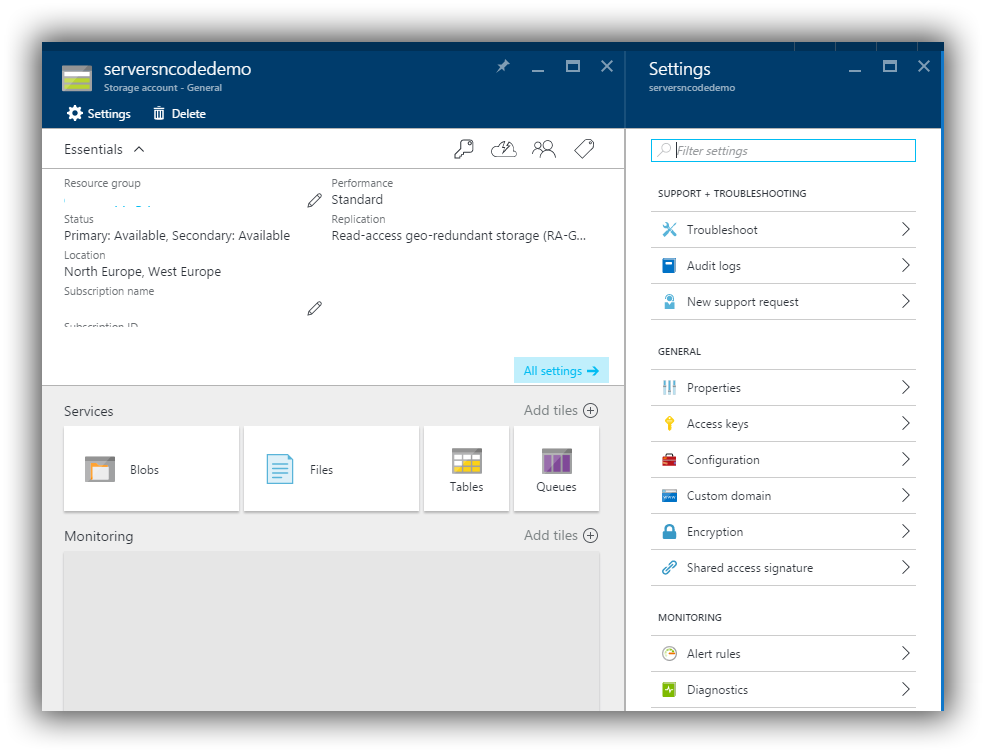
Once it's deployed go ahead and open it up. Selecting "Tables" will show "no tables found" in the tables blade.
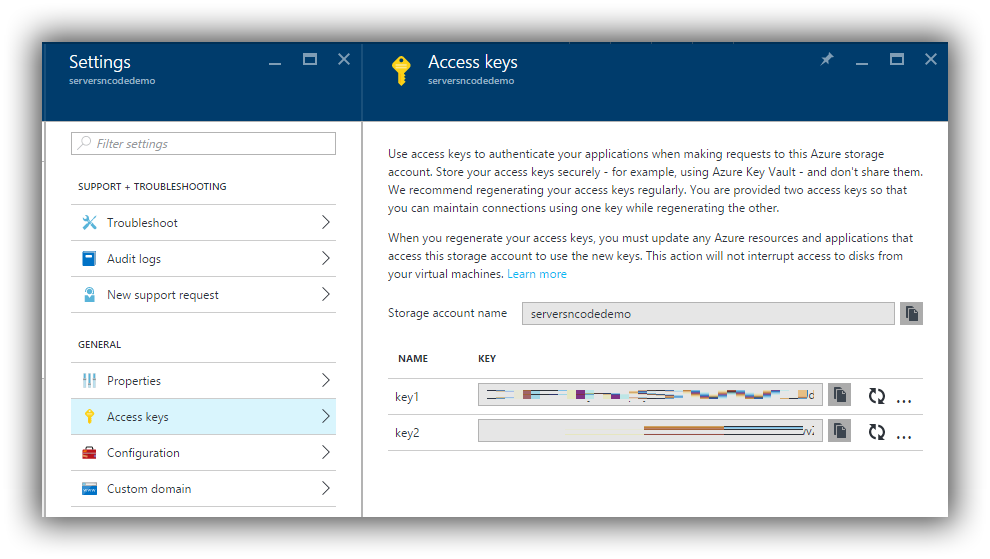
We need the Access keys for be able to do anything. In the main storage blade select "Settings" and click to open Access keys this will show you a "Key1" and "Key2"
We'll need them next.
Do some code
For the sample code github
In Visual studio create a new Console Application
Install the Azure Storage nuget package
Now in the main cs file lets bring in the Azure Storage
using Microsoft.WindowsAzure.Storage; using Microsoft.WindowsAzure.Storage.Table;
For Azure Storage our connection string looks like this
DefaultEndpointsProtocol=https;AccountName=storagesample;AccountKey=storagesamplekey
Where StorageSample and StorageSampleKey would be replaced with the account name and the key that you want to use.
For this demo I created a static string and loaded my connection string into it.
Next we need to create our entity. Create a new class 'PlayerEntity'
In this class we'll turn it into a Table Entity
using Microsoft.WindowsAzure.Storage.Table;
public class PlayerEntity : TableEntity
The rest of our Player class should come together like this
public class PlayerEntity : TableEntity
{
    public PlayerEntity(string skey, string srow)
    {
        this.PartitionKey = skey;
        this.RowKey = srow;
    }

    public PlayerEntity() { }

    public string Sport_VC { get; set; }
    public string Club_VC { get; set; }
    public string First_Name_VC { get; set; }
    public string Last_Name_VC { get; set; }
    public string Position_VC { get; set; }
}
Back over to our Program.cs, lets add some code to do something.
    static void Main(string[] args)
    {
        CloudStorageAccount storageAccount = CloudStorageAccount.Parse(_connectionString);

        // Create the table client.
        CloudTableClient tableClient = storageAccount.CreateCloudTableClient();

        // Retrieve a reference to the table.
        CloudTable table = tableClient.GetTableReference("player");

        // Create the table if it doesn't exist.
        table.CreateIfNotExists();

        // Get All Players for a sport

        TableQuery<PlayerEntity> query = new TableQuery<PlayerEntity>().Where(TableQuery.GenerateFilterCondition("PartitionKey", QueryComparisons.Equal, "soccer"));

int iCount = 0;
        foreach (PlayerEntity entity in table.ExecuteQuery(query))
        {
            Console.WriteLine("Club:" + entity.Club_VC + " Player Name: " + entity.First_Name_VC + " " + entity.Last_Name_VC + " Position: " + entity.Position_VC);

            iCount++;
        }


    }
Lets walk through this code step by step.
        //Create a storage account object.
        CloudStorageAccount storageAccount = CloudStorageAccount.Parse(_connectionString);
This will create the storage account with our connection string.
        // Create the table client.
        CloudTableClient tableClient = storageAccount.CreateCloudTableClient();

        // Retrieve a reference to the table.
        CloudTable table = tableClient.GetTableReference("player");

        // Create the table if it doesn't exist.
        table.CreateIfNotExists();
Create a table client and then we create a table called "player" then we check if it exists. If it does not then table.CreateIfNotExists() will create a new table for us.
Next we'll go and get some data from the table.
        // Get All Players for a sport

        TableQuery<PlayerEntity> query = new TableQuery<PlayerEntity>().Where(TableQuery.GenerateFilterCondition("PartitionKey", QueryComparisons.Equal, "soccer"));
You might have worked out the theme for this now. But this code allows us to create a query to get the players for a sport. In this case "soccer", The partition we created on this table is for Sports. Once we have built the query we can execute it.
int iCount = 0;
        foreach (PlayerEntity entity in table.ExecuteQuery(query))
        {
            Console.WriteLine("Club:" + entity.Club_VC + " Player Name: " + entity.First_Name_VC + " " + entity.Last_Name_VC + " Position: " + entity.Position_VC);

            iCount++;
        }
Here we execute the query which will return records for the Sport and then write them to the console. If you run this application now it will return nothing because we haven't created any data.
So lets create some data
static Boolean CreateData(string sSport, string sRow, string sFirstName, string sLastName, string sClub, string sPostition)
{
Boolean bSuccess = false;
        // Create our player

        // Create the entity with a partition key for sport and a row
        // Row should be unique within that partition
        PlayerEntity _record = new PlayerEntity(sSport, sRow);

        _record.Sport_VC = sSport;
        _record.First_Name_VC = sFirstName;
        _record.Last_Name_VC = sLastName;
        _record.Club_VC = sClub;
        _record.Position_VC = sPostition;

        //Create a storage account object.
        CloudStorageAccount storageAccount = CloudStorageAccount.Parse(_connectionString);

        // Create the table client.
        CloudTableClient tableClient = storageAccount.CreateCloudTableClient();

        // Retrieve a reference to the table.
        CloudTable table = tableClient.GetTableReference("player");


        // Create the TableOperation object that inserts the customer entity.
        TableOperation insertOperation = TableOperation.Insert(_record);

        try
        {

            // Execute the insert operation.
            table.Execute(insertOperation);

            bSuccess = true;
        }
        catch (Exception ex)
        {
            bSuccess = false;
        }


        return bSuccess;
    }
What does this code do,
First of all we create a new method for creating the data.
        // Create our player

        // Create the entity with a partition key for sport and a row
        // Row should be unique within that partition
        PlayerEntity _record = new PlayerEntity(sSport, sRow);

        _record.Sport_VC = sSport;
        _record.First_Name_VC = sFirstName;
        _record.Last_Name_VC = sLastName;
        _record.Club_VC = sClub;
        _record.Position_VC = sPostition;
We create our player Entity and setup the values.
PlayerEntity _record = new PlayerEntity(sSport, sRow)
Will create our table entity for us with the Row ID and the Partition key.
Row ID should be unqiue
TableOperation insertOperation = TableOperation.Insert(_record);
This sets it all ready to go, then we do the table.Execute(insertOperation); to create the record on our table.
So what I've done for this demo is add a iCount int that will hold the record count. Then at the end we add a call to our create data and it will create our first player.
CreateData("soccer", iCount.ToString(), "Wayne", "Rooney", "Man Utd", "Striker");
Once you run the app it will create the footballers and that's it, it's very simple to get started.
For the sample code github